Wednesday, 11 September 2013

Make Your Windows 7 Look Like Windows 8

Why would you want to do that? Really. Aha. Now, Windows 8 may be stupid, but it is not ugly. And so you find yourself in a predicament. You want the looks provided by the latest Microsoft operating system, but you do not want to buy the new system or use its oligophrenic Start Screen. So what's the alternative?
There are many. However, your biggest gripe is financial. Really, paying money for a tiny service pack that Windows 8 really is might not be the best idea, for you, that is. If you think about, Microsoft is smarting up its business model. Instead of asking you for a lot of cash once a decade, they are asking for smaller sums every two or three years, which you will be more inclined to do. Still, you don't want to pay. And you want the looks. No problem, you can do a manual visual transformation. Follow me.
Teaser

Introduction

There is almost a paradox here, with me writing an article on how to transform a decent platform like Windows 7 into one that is inferior to it. But then, my readers asked, so I am kind of being nice, plus let us not forget, the change will only be cosmetic. You will still have the solid, classic desktop with some extra bling bling.
What we will do is a series of hacks. Nothing too magical. The whole bible of procedures is available step by step on askvg.com, where you can find another hundred articles revolving around this and similar topics. The necessary changes require replacing various system files, editing the registry and other merry changes. Needless to say, backups are in order, and I strongly advise you never to undertake this kind of makeover on your production boxes. Now that you are ready and you fully understand the risks, let's move on.
In theory, you do not need my article here. It's redundant. However, there are two things that it provides that most other tutorials do not. Plenty of superb screenshots, with real-life examples, not just trivial virtual machines, and my pure awesomeness, which manifests in crystal-clear instructions laced with humor, style, grace, and goodness.

Change the theme and associated elements

There are several layers of changes you can introduce - the desktop theme, including icons, fonts, colors, sounds, and background wallpapers, the boot screen, the logon screen, windows controls, and other elements. In a way, this is similar to what we did with Windows XP when we wanted to make it look like Windows 7.

Allow third party patching

This is your first step. Otherwise you won't get far. There are several utilities available, but you might want to try the Universal Theme Patcher tool. After you run it, patch the three needed files. Reboot.
UX patcher

Install new theme

It goes like this. You will need to download the Windows 8 RTM theme bundle, a zipped archive. It is available on deviantART, use with caution and blame me not for any cockups. Anyhow, extract the archive using a program like 7-Zip, which you can find featured on mymost recommended list for Windows users. The archive contains most of the stuff we need for the steps below. All right. Next, copy the theme data from your extracted archive into the Windows Resources/Themes folder. Once placed there, the themes will be available for change through the Personalize menu.
New theme
This is only the first step, we want more!

Change Windows Explorer buttons

To do this, you will need to replace the ExplorerFramer.dll both in System32 andSYSWOW64 folders. However, this is not a simple thing, as you will need special permissions for that. Running Windows Explorer or command prompt as administrator will not be enough. You will have to take ownership of relevant files using additional registry hacks, and even then, the files might be in use, so your change will fail. How I solved the problem? Simple. I booted into a Linux live session and did regular copies there, without any fuss or permission problems.
Buttons

Change Start menu icon

Although Windows 8 comes with its inefficient flip thingie, in Windows 7, you retain the good ole Start menu. The icon can be changed to match the new Windows style. This is somewhat like the Classic Shell thingie.
The program you want is Orb Start Menu Changer. The extra icons for the menu are available in the Extra folder from your Windows 8 RTM themes that you downloaded earlier. Choose the one that suits your taste best. The downloaded theme contains three different options.
Orb Start Menu Changer
And you will get something like this:
New start menu

Change Logon screen

Not quite simple, but doable. This stage consists of two steps, one the logon screen itself, and two, the background image. For the first step, you will need to copy two DLL files over existing files, named authui.dll and basebrd.dll. Again, much like the ExplorerFramer.dll, the best way to accomplish the copy without trouble is to boot from a live Linux CD or yourdual-boot, if you have it. Again, here's the deviantART page.
For the background image, the edit process can be accomplished manually, without third-party tools by locating the aero.theme file for your selected theme and copying it outside the Windows folder, so you will be able to edit it. This is somewhat similar to making changes to Flash mms.cfg file we did in our troubleshooting tutorial some time ago.
You will first need to edit the theme to allow Logon screen changes, then copy the file back to its expected location. Next, you will need to grab some visually pleasing file that you want to use as your background, save it in JPG format, make sure it is less than 256KB in size and name it backgroundDefault.jpg. The image file needs to be placed underinfo/backgrounds directory inside System32\oobe folder. Both info and background directories do not exist, and you will need to create them manually.

Change boot splash

Boot screen slash splash can be edited using the Windows 7 Boot Updater configuration tool. You will also need a boot screen file. Looks thusly:
Boot screen update

Tile screen

This is really pushing it. If you're mulling using the Start Screen, perhaps you're better off with Windows 8. But if you want to fool your friends, then you might want to consider trying Rainmeter and Omnino utility, based on the Windows Phone 7 layout.
What these tools do, is not so much replace your desktop with a flippable menu screen but add interactive widgets onto your existing desktop, combining some of the functionality of the equivalent Start Screen in Windows 8. If you will, you can treat the suite as Conky on steroids for Windows.
Best part? It's just a process. So if you do not want to use the new features, just exit the tool, and you're back to using your desktop in the regular way. If you want the Charms-like sidebar, live tiles and other elements borrowed from the Windows 8 world, then you can install the application and the relevant skin. I do not like this, but it's your choice.
Rainmeter setup
Install Omnimo
Setup
Choose theme
Omnimo installed

Other changes

Many other tweaks are possible, but there's no reason for me to monkey the original article. I applied only a small subset of most relevant changes that I found useful for the task at hand. You can do all the rest if you fancy them. And remember, this was done on a proper laptop, no virtual machine tomfoolery.

Final looks

And some screenshots:
Final looks 1
Final looks 2
Final looks 4

Conclusion

So there we go. I must admit I skipped some of the information, but I am sure you will manage. All the credits go to askvg.com, for compiling such a useful resource. With some effort, skill and luck, you can easily transform your system looks.
And then, there's the question of Windows 8 validity. If it only takes about ten minutes to transform Windows 8 into Windows 7 using the Classic Shell, and about one hour of work to make Windows 7 to resemble its successor, is there any real reason for a whole new operating system to be born, to exist and to sell? Oh well, I am turning philosophical, and all you wanted was a simple, colorful guide to help you showoff to your friends. Then, in that case, mission accomplished. Enjoy.
Cheers.

Eset Nod 32 6 Username And Passwords

Active your Eset smart security up to 05-29-2015 
_______________________________________::
ESS

Username: EAV-80593282
Password: b24ujn4k88
Expiration: 29/05/2015

EAV

Username: EAV-84218011
Password: fk3tv8p57v
Expiration: 25/03/2014


Tuesday, 10 September 2013

Make your Windows XP look like Windows 7

Let's say you really love how Windows 7 looks. But you don't have money to buy a copy or you do not wish to part from your sturdy, loyal Windows XP workhorse. No problem. Today, I will show you how you can make your Windows XP look smarter, sharper, cooler, more modern, all for free and about 10-15 minutes of your time.
There are millions of desktop customization and tweaking articles all over the Web. I will hardly be reinventing the wheel. Therefore, to make things simpler, I will refer to several popular and useful sources that served as an inspiration for this article, as well as provide you with a wealth of links and resources to even more customization and beautification guides. Let us begin.
Teaser

Get the tools!

For this, you will need to go to askvg.com, Tweaking with Vishal, where you will find detailed instructions how to get your Windows XP transformed into art-deco post-nuevo thingamajig.
There are several themes available, I will use the SevenVG Black RTM theme, with the Windows 7 superbar. Alternatively, you can go for Normal taskbar, as well as use the standard theme. The guide also offers additional tweaks, including icons, boot screen, welcome screen, cursors, taskbar, wallpaper, shutdown, system properties, and other elements. Download the theme, but don't run it just yet.

Patch system to allow non-Microsoft themes

Before you can use a theme that has not been digitally signed by Microsoft, you will have to run the UXtheme Patcher, to override this. The link provided is for Windows XP SP3. There's a separate utility for Windows XP SP2, so please pay attention.
Patch theme

Install & Apply theme

After running the utility, reboot for the changes to take effect. Once the system comes up, you can apply the downloaded theme, in our case SevenVG Black RTM.
Install theme
After the theme is installed, your desktop will look something like this:
Desktop
Start menu
Decent, but nothing special yet. We can definitely improve it a bit.

Further customization

In addition to many suggestions offered in the original article, you may want to try a few more tweaks. For example, change the wallpaper, place the Quicklaunch bar on the far right as a vertical bar and use large icons, add the Address bar to the top of the panel, so you have a sort-of-integrated search-run applet always available, and change the fonts. How about that? Maybe not the brightest idea in the world, but it could work.
Which is exactly what I did ... Something like this:
Search
Search zoomed
Or perhaps:
Cool

Use Styler for extra tweaks

You may also want to try Styler to make your desktop even prettier. Styler is included with the theme, so you just need to run the installer and follow the instructions.
Install
Settings
Styler will let you use additional tweaks, like shadows, font type ad contrast, icon spacing, hiding desktop icons for minimal clutter, and more. For example:
Final
Shadows
Keep on playing until you get the desired results:
Another desktop
Here's the Taskbar, with several windows open. I'm not using the Superbar feature, which I do not find that intuitive or productive. If you don't like the Taskbar size, you can use the theme offering the slimmer, normal-sized one.
Taskbar
The Control Panel:
Control Panel
Here's what Firefox feels like:
Firefox
Reasonably lovely, ain't it? Not the actual style, the hack.

Resources!

Now, several great resources to help you in your artistic quest. Some of the articles refer to Windows XP, others are for Windows 7. Whatever the case, you will find many links and cross-references to other useful tools, tips and tricks for better and more stylish visualization.
Windows 7 desktop customization guide (my own, another article)
AskVG (the one Windows theming, skinning, customization site to rule them all)
Aerosnap (Aero for Windows XP)
Visual Tooltip (shows thumb previews of open windows like Opera)
Windows 7 themes (thread on Wilders Security forums, with many useful links)
Windows 7 - The new XP (thread on Wilders Security forums, with many useful links)

Conclusion

If you see no reason in switching to Windows 7 and would still like to impress your divorced neighbor, then you now have the tools to make your aging Windows XP look posh and nobby.
Using the available themes and additional utilities, Windows XP can be given a complete visual makeover to make it virtually indistinguishable from the newer Windows releases. While the Embedded, Royale and Royale Noir themes for Windows XP are already great, slick, rounded, soft, and precise, you now have an whole new repertoire of bells and whistles to show off.
Whether you keep on using Windows XP or move on is entirely up to you. But if you don't want to be forced, you have the option to make your Windows XP look any which way. Hopefully, you've liked my article. For an artistically challenged oldtimer, I believe I've done a rather decent job polishing up the desktop, dontcha think?
If you have more tips or tricks to suggest, feel free to email me. Many thanks to Raji for inspiring the article. See ya around.
Cheers.
In order to patch the server do these steps:
1. Download the CS 1.6 Non Steam 47+48 protocol patcher and unzzip it . Copy the files to your main directory (where hlds.exe is).
2. Open cstrike\server.cfg and add these lines:
Don`t forget to set the sv_lan 0 in server.cfg.

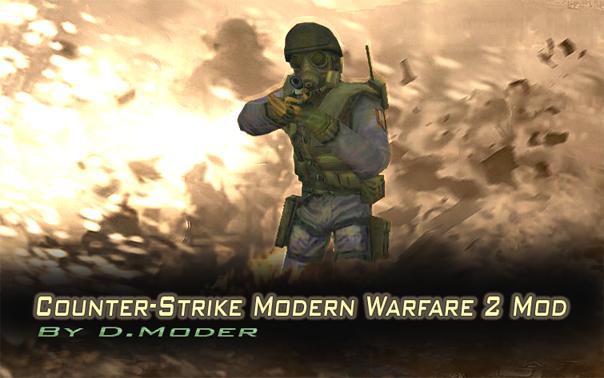
Counter Strike 1.6 COD MW 2 MOD

Download Counter Strike 1.6 Modren Warfare 2

As the name says, in this Counter Strike 1.6 version we tried to bring some of the MW2 look and gameplay into CS 1.6. This is not justa reskinned CS 1.6, the changes made to the game are significant.

Weapon skinns and models are made to look like those in Modern Warfare 2, player models, even some animations, too. We changed the sounds and some controls to make it feel like MW2 gameplay.

This CS 1.6 MW2 version is playable online, on any server you like, but you can play on a LAN server (with or without bots) started ingame from Create Server, if you like.

The mod was made by an international team, and adapted for online gameplaye and packed by us.

Installer size: 758 MB
Installed game size: 1.4 GB
Warning! If you recive an error at w_c4.mdl when trying to connect to online servers, download and install CS 1.6 MW2 Update 1.1 C4 Fix. Without this one you won`t be able to connect to some of these servers. Double click the exe and chose as installation folder, the game`s main directory (Counter Strike 1.6 Modern Warfare 2).
Download CS 1.6 MW2 Update 1.1 C4 Fix
Size: 300 KB


Some instructions for Counter Strike 1.6 Modern Warfare 2


1. Specific key bindings
- E - quick slash (press and hold down the key for fasn knife hit)
- F - quick flash throw (press and hold down the key ; you have to buy the flashbang first)
- Mouse 3 - quick he throw (press and hold down the key ; you have to buy the he grenade first)
- C - flashlight
- V - Use Item
2. If you want to change the specific binds, go to cstrike\userconfig.cfg (lines 71,76,81).
To disable those bindings just comment the lines (put // in front of them), and then bind whatever key you want ingame (Options -> Keyboard).

3. You can start a LAN listenserver from Create Server, and add bots.

4. You can enable/disable some plugins for listensever in
cstrike\addons\amxmodx\configs\plugins.ini

5. Thew game`s default instalation is on 1024x768 resolution. If you use a wide screen desktop you can change the backround, game menu, to fit to your resolution.
Go to Counter Strike 1.6 Modern Warfare 2\cstrike and delete or rename the resource folder. Rename resource_wide folder to resource, then in game chose the 1280X720 resolution.

COUNTER STRIKE 1.6 UCP HACKS

Fighter FX 7.0  100 % bojn kto qitsa , nese lun LAN , munesh me lu ,.Ne server me sxe smunesh me edhe sxe edhe qitsa  ,kshtu  me F12 munesh me nal , me F12 i leshon apet. Extraktoni  dikun edhe hin te iconi FighterFX
Kujdes : Nese nuk e kini instalun cs ne C:\Program Files\Valve\  - , ather nuk ju bojn , ather duhet te veproni kshtu 
- Clikoni te iconi FighterFX tani hapet cheati , tani hini Cheat Configarition
- Pastaj shkoni tek ::Steam Patch directory :: pastaj shkoni search edhe  e hpyni cs tuaj ku e kni edhe iconin hl.exe


Hypnotick Hook


     Download BaDBoYv4.2.rar      

//====== Project VDC: Redux =====//== Version 2.09 - VAC2 Proof ===
//================================


//===================================
//========== How To Install =========//===================================

extraktoni filen ne desktop, leshone roader tani hini ne lojen Counter-Strike

 HiddenESP CrossHairESP New Aimmethods Offsets via ini Colors
via cfg Hackname via ini "+" ESP BoxESP BallESP SpriteESP
NameESP DistanceESP WeaponESP SequenceESP HitESP
LineESP EntityESP ReloadESP AvDraw NoFlash NoSmoke
XQZ Lambert G
Trece de cheating death, SXE Injected si HL Guard


       DOWNLOAD
 DepthRange XQZ Wallhack . Trece de SXE Injected si HL Guard


        DOWNLOAD
 OpenGL Multihack. Features: Aimbot, Wallhack, SpeedHack,
FarESP, Entity, Full ESP, BunnyHop, Crosshairs, Flash Removal,
AimTimer, RadarHack, PlayerGlow, Lambert, FullBright, PixelStyle
si multe altele..
Trece de SXE Injected, HL Guard, Hackhunter


         DOWNLOAD
 Multihack OpenGL. Wallhack, Full ESP, Aimbot
Speedhack, Removals, NoRecoil.
      DOWNLOAD 
        
Aimbot hitbox bones


         DOWNLOAD
OpenGL Multihack. VAC2 Proof, New Loader, Fixed improvements.
Imbunatatiri : trece de cheating death si de SXE Injected


      DOWNLOAD

LINUX : HOW TO INSTALL COUNTER STRIKE SOURCE SERVER

n this page we will explain how to install Counter-Strike and Counter-Strike: Source. We assume you have some Linux knowledge. We will start with Counter-Strike: Source first, If you want to install Counter-Strike 1.6 skip to Page 6 'Linux: Install CS 1.6'

Installing Counter-Strike: Source (SRCDS)


First, lets create a directory where we will run the hldsupdatetool, run the following command:
code:
mkdir srcds
Now we switch to the srcds we just created and download the hldsupdatetool.bin
code:
cd srcds
wget http://www.cstrike-planet.com/dls/hldsupdatetool.bin
If all goes well you should now have the hldsupdatetool.bin in the srcds directory. Now we change the permission of hldsupdatetool.bin so we can execute it and extract the contents from hldsupdatetool.bin
code:
chmod +x hldsupdatetool.bin 
./hldsupdatetool.bin
 Note: after you run ./hldsupdatetool.bin you will get a prompt to agree with the terms and conditions, simply type yes and hit enter.

If all goes well, you should now have two files in the srcds directory, the hldsupdatetool.bin which we downloaded earlier, and asteam file the hldsupdatetool generated, this is the file we will use to install Counter-Strike: Source.

 Note: if you receive a 'uncompress: command not found' message it means your server does not have uncompress installed. You have two options to easily work around this, try the following while logged-in as root:
code:
ln -s /bin/gunzip /bin/uncompress
Then try to run ./hldsupdatetool.bin again. If that does not work, or you do not have root privileges you can download the binary file we have available:
code:
wget http://www.cstrike-planet.com/dls/steam

Now that you have the steam binary file, Type the following command to begin installing CS Source
code:
chmod +x steam
./steam -command update -game "Counter-Strike Source" -dir .
 Note the period after -dir

By now, the Counter-Strike Source install should have started:

SRCDS now installing

Install times will vary anywhere between 30-60 minutes depending on your server connection speed and how congested the Steam network is. Once setup has finished it will display a "HLDS installation up to date" message. Now we are ready to start the server.

Counter-Strike command line options


Below is a list of options you can use when starting up the server.

-console
Initializes console mode

-autoupdate
Automatically update the server when Steam updates are released

-game 
The HLDS mod you want to run

+maxplayers 
Amount of players to allow

+map 
The map to start the server with

-port 
The port number the server should run on. Can be left out if you plan on using the default port (27015).

-ip 
Useful if you have multiple IPs and want to assign a particular IP to the server.

There are a couple of ways to start the server; for simplicity we will go the easy way. We want the server to run in the background, so we issue the following command:
code:
./srcds_run -game cstrike -autoupdate +maxplayers 20 +map de_aztec > /dev/null 2>&1 &
If you are wondering what > /dev/null is; this will send no output, and the ending '&' will run the server in the background. This would be the most common way to start the server. Sometimes we like to see what is happening while the server is running, mostly for debugging purposes:
code:
./srcds_run -game cstrike -autoupdate +maxplayers 20 +map de_aztec > srcds.log 2>&1 &
The above will start the server, send all output (logging) to a file called srcds.log and run in the background. Everything the server generates will be sent to srcds.log, very useful if you want to see any errors that are happening while the server is running.

 Note: if you choose to send output to a file, remember to periodically delete the file, it can grow quite large on an active server. Keep in mind this should be used mostly for debugging and not for a production server.


Page 6.


On the next page we'll cover CS 1.6 on Linux.